home resume subscribe contact publications design teams layouts altered art/minis cards

Monday, July 30, 2012

ZVA Creative July Blog Hop!

Zva Creative and our talented Design Team welcome you to our July blog hop!
The Blog Hop begins at Zva Creative's blog! Be sure head on over to check it out! Leave a comment there for a chance to win an extra prize package just for visiting the blog and telling us that you stopped by! You will also find a complete list of all the participating blogs there (in case there is a glitch along the way).

As you know, Zva offers many beautiful color groupings for pearls, flowers and crystals. We want to make sure that they shine bright for you, so each designer was will be sharing a creation using a specific color or color combination on their blog hop project. If you like what you see you can find a list of stores and online retailers that sell Zva HERE.
My assigned colour this month was Olive Green (can ya tell!?) so I tried to incorporate as many green, bling flourishes and flowers as possible!  This layout was majorly inspired by the wonderful Finnabair (I recently took one of her classes and was dying to try a little more grunge).  Lots of inks and mists to complete this project...
Although the flowers from ZVA were already beautiful shades of green, I intensified the colour a little more by misting them a deeper shade.
The metal elements are from Graphic 45's Staples Collection and the paper is from Bo Bunny's Campalot Collection.

If you would like to play along with our design team, just follow along the blog path. I am linking to one of the Zva designers and that designer is linking to the next and so on. Be prepared to be inspired along the way!

Hidden on FIVE of the designer's blogs is a Zva Creative prize package! Winners will be randomly chosen after the hop is over, so it's important to leave a comment on as many blogs as you can along the way.

The Blog Hop starts today, July 30th and runs through midnight US Eastern Standard Time on Tuesday, July 31st. 

The 5 winners will be announced on Wednesday, August 1st on Zva Creative's blog. We will do our best to notify each winner, but it's best if you can pop in to Zva's blog on Wednesday.

All you need to do is leave a comment on this Blog Hop post... you do not need to leave a comment on each and every designer's blog post to qualify. However, the more times you comment along the blog hop path, the more chances you will have to win.

We also thought it would be more fun to add even more chances to win our blog hop prize! To increase your chances of winning:

* Comment to let us know that you posted on your Facebook page about our hop (link to any of the blog hop posts)
* Comment to let us know that you "tweeted" about our hop (link to any of the blog hop posts)
* Comment to let us know that you asked your local store to carry Zva creative products. If they already do, that's fantastic, maybe you can suggest other products that they don't carry.
*Hop over to Zva's blog and leave a comment there to tell us that you made it there!

 The blog hop begins here at Zva Creative's blog. Your next stop is Carole Maurin. Enjoy!

 Thank you for joining us!
 P.S. Mark your calendar to join us again on August 27th for our next Zva blog hop!

Thursday, July 26, 2012

Finn-alicious!

HOLY LORD!! Talk about getting major crafty mojo inspiration!! I had the opportunity to attend one of Anna Dąbrowska's classes today and WOW is all I can say! I am totally addicted to the grunge!
Here is the layout I made in her class.  LOTS of layers, mists and inks... (will try to get more pics tomorrow - I just took this photo after class in the room...)
A few pics from the class...
So talented, so sweet, so funny and entertaining and so beautiful!
Thanks so much for stopping by!!!

Wednesday, July 25, 2012

Smile

If you haven't already heard, 7 Dots Studio is coming out with TWO new collections this summer - Domestic Goddess and Hopefully. I cannot wait to play with these gorgeous new lines and to celebrate their arrival a new Laboratory Challenge was posted on the 7 Dots Blog yesterday. The challenge was to use the 4 existing collections in 1 project. How fun!
For the project above, I did indeed include all four of the current 7 Dots papers.  I love how each collection comes with coordinating chipboard elements and stickers - the perfect size to stick in here and there and to accent you projects. 
I have also used many metal elements on my page here.  ALL are from Graphic 45 - including the new keys and keyhole - released this past CHA.
Lots of wonderful layers accented with some butterflies and flowers from ZVA Creative.
Thank you so much for your visit today!! I'll be back again tomorrow with some more scrappy goodness!

PS - My sweet and dear friend Anna (Finnabair) is in town tomorrow and I am meeting up with her in the afternoon as well as taking one of her mixed media classes! Cannot wait - will be sure to post some photos!!

7 Dots Supplies:
Dreamer Collection: 12×12 Elements, Drive All Night
Wonderland Collection: 12×12 Elements, Royal Garden, Spades and Clubs
Elise Rebel Collection: 12×12 Elements, Extraordinary
All I Ever Collection: 12×12 Elements
Chipboard
Graphic 45: Metal Brads, Clothespins, Hinges, Door Plate, Keyhole, Key
ZVA Creative: Flowers

Monday, July 23, 2012

Graphic 45/Art Glitter/Wa​nt to Scrap Blog Hop

Happy Monday and thank you for joining me on an amazing blog hop among THREE fabulous scrappy companies.  For this entire week, Graphic 45, along with Want 2 Scrap and Art Glitter, will be having a blog hop filled with tons of inspiration and your chance to win one of the TWO prizes shown below!

I have supplied you with links to Graphic 45's Design Team Schedule.  To visit the Design Team schedules of the other participants be sure to visit the Want 2 Scrap Blog and the Art Glitter Blog as well.

Monday, July 23rd
Jane Tregenza: http://janetregenza.blogspot.com/
Maiko Miwa: http://shiny-scrap.blogspot.com/
Tara Orr: http://eachmoment-onlyonce.blogspot.com/

Tuesday, July 24th
Alberto Juárez : http://vintageodyssey.blogspot.com/
Gloria Stengel : http://gloriascraps.blogspot.com/
Nicole Eccles: http://www.nicoleeccles.com/

Wednesday, July 25th
Arlene Cuevas: http://butterflykisseswithlove.blogspot.com/
Jim, The Gentleman Crafter: http://thegentlemancrafter.typepad.com/
Betto Cesare: http://scrapguys.blogspot.com/

Thursday, July 26th
Clare Charvill: http://mycreativespirit.blogspot.com/
Kristin Wilson: http://www.kristinwilsonhandmade.com/
Sharon Ngoo: http://glooshmoo.blogspot.com/

Friday, July 27th
Denise Hahn: http://www.inmyblueroom.blogspot.com/
Laura Denison: http://www.followingthepapertrail.blogspot.com/
Susan Lui: http://luv2scrap-pages.blogspot.com/
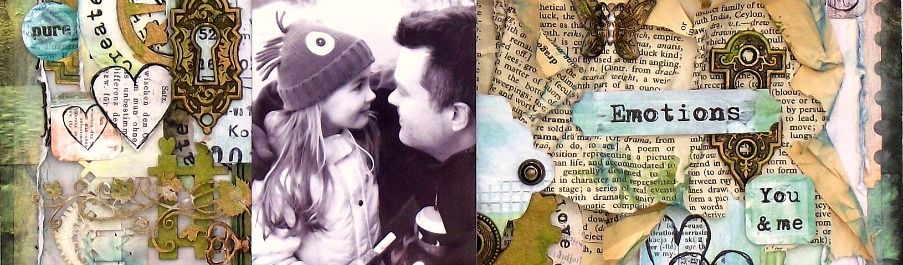
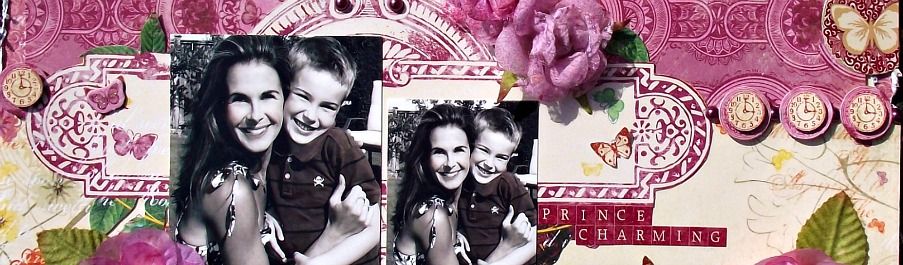
The layout I`d like to share with you today is very special as it hilights one of the new tattoos I recently got. LOVE it - its the initials of my three kiddos!!  I used the beautiful papers from Graphic 45`s Olde Curiosity Shoppe Collection and kept most of my background neutral so that the few punches of colour I did include, stood out even more.
Here you can see some fussy cut elements that I hilighted with baby bling from Want 2 Scrap.  I also took one of the chipboard scallop rectangles from Want 2 Scrap and traced the shape onto a brightly coloured piece of paper from Graphic 45.  I love the way it raises the centre of my project and really does a fantastic job framing the photos and drawing the eye to the centre of the layout.
LOVE the beautiful, delicate glitter!! It was so easy to apply with the extra fine tip added to the glue bottle.  The colours are out of this world gorgeous and of course come in every colour of the rainbow!  Here I added touches to my butterfly wings as well as to the centres of my flowers.

Ink by Tara Orr
Supplies:
Graphic 45 Olde Curiosity Shoppe Patterned Papers: Olde Curiosity Shoppe, Mercurial Masterpiece, Exquisite Motif, When Pigs Fly, Butterfly Specifics
Graphic 45 Olde Curiosity Shoppe Alphabet Stickers
Graphic 45 Olde Curiosity Shoppe Stickers
Graphic 45 Olde Curiosity Shoppe Tags 1
Graphic 45 Olde Curiosity Shoppe Tags 2
Graphic 45 Metal Hinges
Graphic 45 Metal Brads
Want 2 Scrap Baby Bling
Want 2 Scrap Tags
Want 2 Scrap Scallop Rectangle Chipboard
Art Glitter Designer Dries Clear Adhesive
Art Glitter Lagoon Ultrafine Opaque
Art Glitter Wildwood Ultrafine Transparent
Petaloo Flowers
Scrapbook Adhesives 3D Foam Squares
Graphic 45 an award-winning scrapbook and paper crafting company­— owned and operated by a mother and her two daughters.  Together we create vintage inspired crafting products that capture the flamboyant style of the 1920's and 30's - with vibrant color, irresistible texture and imaginative design to create products with decades-old appeal that's both fresh and familiar. Let our products inspire your next scrapbook layout, card, album or home decor project.
Want2Scrap™ manufacturers rhinestones lines including the specialty Nestabling™  line along with the newly released Nestaboard™ chipboard line that coordinates perfectly with the Spellbinders™ Nestabilies™ die templates. Want2Scrap™ also manufacturers their own line chipboard albums and accents, acrylic albums, and multi-layered laser designs and other fine scrapbooking products. Want2Scrap™ brings ease of use and flexibility in their product lines by offering products uniquely tailored to its customers’ needs.
Spread the Sparkle! Be it cosmetics, scrapbooking, t-shirts, cards, jewelry, quilts, rock star toes, home decor or even cement...everything is better with Art Glitter on it! Barbara Trombley opened Art Institute Glitter, Inc. in 1982 and now supplies artists and artisans, crafters and craftsmen with more than 400 brilliant cosmetic quality glitter colors and industrial-strength adhesives. Art Glitter products have been featured on “The New Martha Stewart Show”, “Carol Duvall Show”, HGTV, Home Shopping Network and several times in “Martha Stewart Living Magazine” including this upcoming December, 2009 issue. Thousands of retail stores throughout the world carry Art Glitter products. Barbara’s first book, “Glitter Artistry: Bags, Tags & Cards,” was warmly received by artists in 2006 and is still a big hit today (Sterling Publishing, Inc.). Art Glitter’s retail showroom is located in Historic Old Town Cottonwood, Arizona.

Thanks for stopping by today!! Be sure to check back all week for your chance to win some amazing prizes!!

Wednesday, July 18, 2012

CHA Reveals from Graphic 45!

Happy Wednesday!  I've been flying solo since Monday morning - my hubby and brother in law took the kids camping for a few days so I've had the entire first part of this week all to myself.  Bliss.  Have to admit I miss them terribly and have done nothing but tidy up the house, clean bathrooms, do laundry, cut the lawn, etc. but it was quite overdue!
I am excited to share with you a few pieces I created using the NEW collection from Graphic 45 - Happy Haunting!  These tags were super fun to create and the vintage images were so lovely to work with. The beautiful ribbons are from May Arts and compliment the papers just wonderfully.

I hope you enjoy the rest of your week. Thanks so much for stopping by today - until next time!

Thursday, July 12, 2012

10-Minute Card Challenge

This month's challenge over at the Graphic 45 blog is all about fast and beautiful cards!  Read the details about this fun and inspirational challenge below. This is a great way to get your creative gears turning!
To help get you started, I've created a simple card sketch below as well as a quick and easy card using Graphic 45's Ladies' Diary Collection.

Although this may seem a little more intricate than a 10 min card, I simply placed several, distressed layers upon one another and cut out one of the images from the Ladies' Diary Collection.  That's it!
To add a little more dimension, I crumpled up a sheet of newsprint and glued it under my main image and then tucked in a little tag on either side and completed with chipboard elements.
You can upload your 10-Minute Cards to the Graphic 45 Facebook page: http://www.facebook.com/Graphic45

Bo Bunny CHA Releases!!

As if releasing a HEAP of new Paper collections wasn't enough, Bo Bunny has decided to add some new LACE, Cardstock and FLOWERS to their mix!  Um, YES PLEASE!!  Here's a little taste of what you can look forward to in the months to come... You may want to visit their blog for all the goodies up close and personal!


NEW 7 Dots Releases!

Um... Have you seen these?????


I think you had better head on over to the 7 Dots blog for a full viewing!

Wednesday, July 11, 2012

Swinger Girl

Happy Wednesday to you all!! Hope you are all having a wonderful week so far! My husband is taking next week off so cannot wait to have a fun little family vacation! The weather is finally cooperating and it feels like summer!! YEA! I wanted to share with you, a layout that I created with Graphic 45's fantastic Olde Curiosity Shoppe Collection.
The colours in this collection are so vibrant and bold that when paired with a neutral background, they stand out even more wonderfully.
Absolutely love the Butterfly Specifics page!! Seriously, the better part of my layouts and cards are covered in these little babies and this particular piece of paper in the Olde Curiosity Shoppe Line is adorned with tons!! Love it and must hoard several sheets!
Some more distressed layers, chipboard pieces and of course metal goodies!! LOVE the hinges and brads!
Thanks for stopping in today!! I'll see you again tomorrow with a card that I created (in 10 min!!) using Graphic 45's Ladies' Diary Collection. A demain!

Friday, July 6, 2012

Tropical Travelogue Mini Album

After every vacation, we are all left with wonderful holiday photos. Sometimes we have so many that the thought of including them all into a scrapbook page or mini album can seem overwhelming. After I returned from a wonderful Hawaiian vacation with my mother last year, I had so many memorable photos that I didn’t want to leave any out. Solution: An envelope album! I was able to display a few of my favourite photos on some of the pages and all of the other photos were easily tucked into several of the envelopes within the album itself.
Directions

Front Cover: This album cover was super fun to create as it had an element of overlap due to the envelope. I first covered the front cover and overlapping top flap of the envelope with some ‘Island Jewel’ paper . I then cut out a rectangular shape from the ‘Hibiscus Heaven’ paper and layered on top of the main page while leaving the envelope flap just with the green paper. I then built up my front cover by layering several fussy cut flowers from the ‘Island Jewel’ paper around a paper doily which I placed in the centre of the page. I also added a few tags around my page to complete the inside of the front cover.
Now we need to finish the top flap of the envelope which will be covering much of the inside design you just created. I used one of the frame tags from Graphic 45’s Chipboard Tag Sheet and centered it on the envelope flap. I then continued fussy cutting more flowers from the ‘Island Jewel’ paper to surround my frame. Lastly, I embellished with a few more fussy cut butterflies as well as another tag for added dimension

Pages 2 & 3: When creating mini albums, I always like to create my pages so that they coordinate with one another. Using an entire paper collection makes this task much easier. I often create my pages so that they flow into one another so that each facing page ‘matches’ the other. These pages have been built up with several layers of patterned papers, tags, and fussy cut elements from the Tropical Travelogue Collection. I often find that when using a neutral background colour, like the ones on these two pages, a subtle pop of colour really jumps right off the page. You can also use 3D Foam Dots to achieve further dimension for your project.
Pages 4 & 5: Several of my pages were created with wonderful imagery from the patterned papers which I was using. Don’t feel like you need to display all your photos front and centre of your mini albums. Sometimes having a page with wonderfully fussy cut elements, bold colours and beautiful embellishments is enough. If you don’t have an envelope album, try tucking your photos behind your embellishments or leaving space behind your patterned papers. You can even add your own pockets to your mini albums for those extra photos you don’t want to leave out.
Pages 6 & 7: Scrappers often find the transition from layouts to cards or layouts to mini albums quite difficult at first – I know I did. What helped me create these more quickly and more seamlessly is to imagine that I was creating a whole collection of mini scrapbook pages. The way you would compose your layout works the same way you would compose the page in a mini album – simply on a smaller scale. For each page, try changing up your designs as well so that the album flows nicely from one page to the next without looking the exact same. As you can see on these two pages, the first is more of a horizontal design with the paper strips cut lengthwise. The facing page is more of a vertical design with both pages showcasing coordinating patterns and colours as well as several layered elements such as fussy cut tags, birds, stickers as well as the introduction of metal hardware. It is important to showcase several types of mediums within your album so that the final result does not look ‘flat’. Even though papers can be popped up with 3D Foam Squares, etc. the end result will look a little more two dimensional that a project with the addition of twine, flowers, metal, etc.
Pages 8 & 9: I decided to make the most of my tag frame and cut out a photo to fit directly inside. When you include photos directly on your pages, try using similar colours found in your pattern papers or use black and white/sepia toned photos so that they do not compete with your page. Because the area in which you are working is smaller, tiny details go a long way. The simple addition of a bow here, a tag here or a layered element there will create wonderfully diverse effects to your pages.
Tip(s):
  • Because the finished project can be quite bulky, you can close with twine or ribbon wrapped around the entire album. You can include as many photos as you would like with this album – displaying your favourites on each page and inserting any extras in the handy envelope pages.
  • To secure your hemp twine when making a ‘bow’, apply a small amount of Glossy accents to the center of your knot so that it does not come undone.
Supplies:
Graphic 45 4x6 Kraft envelope album
Graphic 45 Tropical Travelogue Paper Collection (8x8 paper pad)
Graphic 45 Tropical Travelogue Tags
Graphic 45 Tropical Travelogue Cardstock Stickers
Graphic 45 Envelope Tags
Graphic 45 Metal Tags
Graphic 45 Metal Buttons
Graphic 45 Metal Hinges
Fiskars Personal Paper Trimmer
Scrapbook Adhesives 3D Foam Squares

Blog Widget by LinkWithin